Hey fellow devs and fellow homelabbers, starting off with a topic that has scrambled quite a few heads. How do you get Proton VPN up and working when you do not have a Desktop Environment for your Linux installation.
The why you do not have a Desktop Environment is a post for another day, but the reason can be extremely varied from just trying out a challenge to only have a terminal to work with, to running/maintaining a server which is where my research began. Not that anyone asked but I manage a Home-lab with few active users and 30 terabytes of usable space. All of the VM (Virtual Machines) have their traffic sent and received via Proton VPN.
VPN’s and Proton VPN
For the uninitiated, a VPN (or Virtual Private Network) in a polysemous sense , routes your internet traffic through a specific server, usually the server can be chosen, for example you are a resident of United States but you want to route your traffic through a server in Paris, France. A VPN service allows you to do exactly this, for all the websites you visit, all requests you send, the server will see an IP of Paris, France and not your public IP in USA, more specifically public IP of your chosen server.
Although, this is what is meant by VPN in a usual sense, the word holds much more depth and it’s usage is just not limited to routing your traffic through a different server. A very easy example would be, let’s say you have a server at home, but none of the services are exposed directly to the internet and you want to keep it that way, but you still want access to them from anywhere in the world, in that case VPN suits your use case, you connect to your Private Network (your home network) Virtually. The how to do this can vary quite a bit and again dear reader, it is a topic for another day, but for your research you can search up Wireguard (which coincidentally will come up later in this post) and also Tailscale (a third party application that makes setting up and maintaining private networks very easy).
Now that the introductions on VPN is out of the way. Let’s introduce Proton VPN a bit. Proton VPN is a VPN service provider operated by Proton AG. Proton VPN has been audited by third party auditors (report on audit by Securitum) that they do not maintain any logs, meaning any site you visit, when you visited and any other data is not kept by Proton, although this doesn’t mean by a long shot you are completely anonymous on the internet but it’s a step. The price for Proton VPN wasn’t exorbitant either, this and no-logs policy made me chose Proton VPN as being suitable for me.
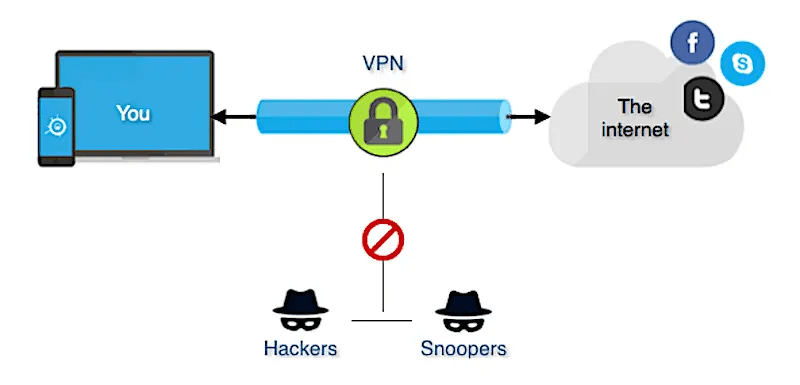
A very clean diagram explaining VPN’s and simple explanation of how it works. Ref : https://networkencyclopedia.com/virtual-private-network-vpn/
Terrible Support of Proton VPN on Linux
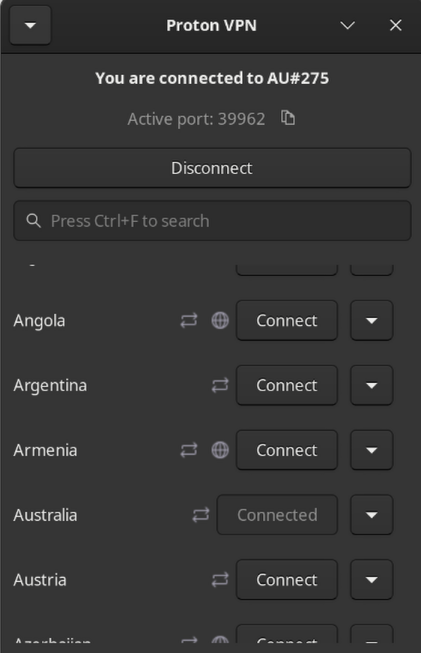
For being one of the few companies I value highly in this day and age, Proton loses a lot of points not being great to use in linux. Although they do have a working Linux app, but that is the extent to which they get brownie points. For anyone wondering, this is the way to install and use Proton VPN in linux https://protonvpn.com/support/linux-vpn-setup. Below is how connecting through the app looks in August of 2025 running on Bazzite OS.
Sometime in 2024, I cannot pinpoint the exact date but I clearly remember end of 2023 and start of 2024, they had a “working” CLI tool for proton VPN for linux. I cannot tell you if it actually worked since I never really tried it, but at the very least there was an offering. I am very sure there will be a good reason why the support was dropped but as an end consumer, unfortunately my interests doesn’t extend that far.
This unfortunately means, Proton VPN cannot run headless in linux as it has and needs a GUI, which for me sounds poorly thought out as it completely rules out headless servers, but who am I to comment on how a (probably) billion dollar business should operate.
For all the hate I am giving them, they atleast were thoughtful enough to not completely shut the door. Although there definitely exists some limitations but hey, existence of something is better than having nothing at all. And as far as speeds go, they work pretty well.
Wireguard our Savior
I won’t give a long winded explanation on what wireguard is but it essentially is a FOSS communication protocol, and is (atleast in my limited experience) faster and lighter than OpenVPN, which was another such protocol and quite widely used.
For the purpose and scope of this blog, we will use Wireguard although ProtonVPN does support OpenVPN too with the operating system being Ubuntu (all flavors of Debian should be fine) as it is one of the most commonly used OS’s but all of these should most definitely work for any OS with a slight tweak.
Packages that you need to install
- Wireguard
- For Debian based systems, apt is the default package manager. To install wireguard run the following command
apt install -y wireguard.
- For other OS’s, you can check here https://www.wireguard.com/install
- For Debian based systems, apt is the default package manager. To install wireguard run the following command
Wireguard needs a configuration file to connect to a server. To get the configuration file from Proton VPN, follow the following steps
- Visit https://account.protonvpn.com
- Log in with your credentials
- Then visit Downloads. It should be present as an option on the toolbar on the left.
- Scroll down and you should find a place to configure and download wireguard conf. It should look something like the picture below.
- Choose VPN options you need, for example if you need port forwarding, which is useful in a lot of cases, toggle on Port forwarding.
- Click create and download the conf file. The file should be downloaded, following the naming convention <certificate-name>-<server>.conf
- Now that we have both wireguard installed and the conf file for wireguard, all it leaves us is connect to the server.
- Copy the configuration file to the directory /etc/wireguard/
- Run the command sudo wg-quick up <name of the conf file>. For example, if the file was named vpn.conf
sudo wg-quick up vpn
NOTE: The wireguard config is valid upto a year, you need to extend this when it expires.

Hopefully everything was up successfully. I didn’t dive into some issues you might experience, as its mostly a straight forward process but if you face anything that needs help, please post a comment below.
Last Few Optional steps
Now that the dust has settled with the fairly short installation, there is one OPTIONAL step you can take, which I personally use. And that is to connect to the server at every restart. For this I very simply use crontab, there can be other shinier ways to do this but I don’t think anything beats the simplicity of this.
- Create a script, for me the script resides in /proton-vpn/start.sh . For you it can be anywhere. Let’s say you want to create the script at the same directory.
- Start by creating the file
sudo nano /proton-vpn/start.sh- Copy paste the same wg-quick up command as before.
sudo wg-quick up vpn- Save and close the file (ctrl + x , select yes)
- Now we need to modify the crontab
crontab -e- Scroll down and paste this
@reboot /proton-vpn/start.sh
Now it should automatically always connect to the server you chose at startup.
Goodbye and See you Soon
Since it is my very first blog, I would really like to get some feedbacks, on what you liked, didn’t like and anything between heaven and hell.
A slight disclaimer, I will probably not completely hold your hand through everything as the goal (at least for now), is to write what I like, don’t like and thoughts out in short form content, what is easily digestible and doesn’t take too much off your and my time. So things like “I use dnf as my package manager instead of apt, how can I do this” topics I will usually skip but I will try my best to attach relevant documentation, and also if you are stuck at a place, comments are always welcome and in the comments I will be a bit more forthcoming, so as not to deviate from the idea that the blog must be short and sweet.
Good bye for now, I will come back with a rant, a discussion or a weird topic very soon.
